Norm Gholston is an authority on old houses, old Portland, restoration, preservation and other stuff. He wrote the book on Portland’s Slabtown (2013) and is a resource to the Architectural Heritage Center, Restore Oregon and other preservation organizations. He also owns an 1890 Victorian in Northwest Portland that he has loving and authentically restoring for the past 35 years.
The kitchen was his most recent project, restoring and painting the walls and ceiling in 2019. He got to the floor in 2020 and was surprised to find this rather fantastic linoleum underneath the existing floor.

Given that the linoleum was probably originally installed around 1910, it wasn’t in terrible shape, but nor was it in great shape and Norm wanted to have it reproduced so it could complete his authentic, robust and functional kitchen restoration. He contacted us, and we were delighted to have the opportunity to work with this truly unusual pattern.
Norm removed this scrap from the floor and we used it to create stencils to reproduce the pattern, and as a color reference.

The pattern is truly unusual and after pouring over 1000+ pages of old linoleum catalogs, we have not been able to find a match or even a similar pattern. The floral elements are very organically drawn and each five-motif cluster creates a circle around the center element.
The first reproduction challenge was to create a base paint layer that had a stippled background similar to the linoleum. This took quite a bit of experimentation, but we were ultimately able to come up with a method that involved three passes stippling with various different paints and glazes. The motifs are also stippled, so we first mixed cream and charcoal paints and stenciled the motifs and then did two additional stippling passes on top of the stenciling.
Here is a comparison of the linoleum scrap and our floorcloth sample:

The colors needed some additional tweaking, but we were finally getting closer and had our technique down.
Here is a photo of the full piece, measuring 10’ x 15’. The base layer is complete, including the several stippling passes, with a heightening of the warm brown of the original, and we are beginning to do the cream stencil pass.

Here, we are almost done with the cream stencil pass:

Here is the completed piece. We were planning to install a thin border employing the background only all around the piece, so an area of the floorcloth that was going to be cut away prior to installation was left blank for this purpose.

This is a close up shot of the linoleum scrap against the floorcloth:

Norm wanted to preserve the original linoleum under the new reproduction. A paper template was created that had the exact shape of the floor with all its doorways, plinth blocks and inevitable lack of squareness. This was used both to create the shape for a luan underlayment that was tacked down on top of the linoleum, and to which the floorcloth would be adhered, and as the template for cutting the 10’ x 15’ floorcloth to size.
This is the floor with the luan installed:

This is the floorcloth with the template set on top as a cutting guide:
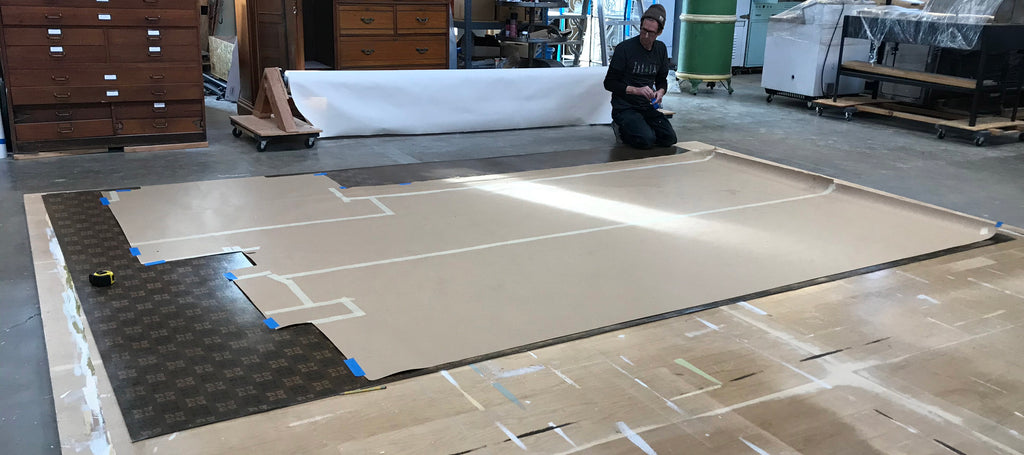
This is floorcloth trimmed to fit in the kitchen:

The trimmed floorcloth was laid out in the kitchen (a perfect fit!) and then backrolled over a tube so that glue can be applied to both the luan and the back of the floorcloth.

The floorcloth has been glued in place, and now the border needs to be filled in around the edges:

Here the border has been installed and quarter round has been added around the perimeter:

Norm’s fully restored kitchen!
